

Direct SDK/API Quickstart
Direct SDK/API Quickstart
The primary function of GroundX is to make integrating data from complex human documents into LLM powered applications simple and performant. This is the direct SDK/API path: you call the GroundX SDKs or REST API from your own application code. By following this quick-start guide you will understand the core workflow of GroundX, and how you can use it to upload complex documents to be parsed, how those documents are stored, and how they can be queried for use in LLM powered applications.
If you’d rather have an agent do this for you — ingest, search, and debug GroundX from Claude, Codex, or another agent runtime instead of writing this code yourself — see Install GroundX Agent Harness instead. The underlying GroundX operations are the same either way.
This Guide Covers the following:
- How to get your GroundX API Key
- Setting up GroundX
- How to create a new bucket
- How to use an existing bucket
- How to upload content to a bucket
- How to check the status of your upload
- How to search for content
- How to use your search results to augment an LLM (i.e. RAG)
Step 1: Getting Your API Key
Before you can use our APIs, you will need to create an account.
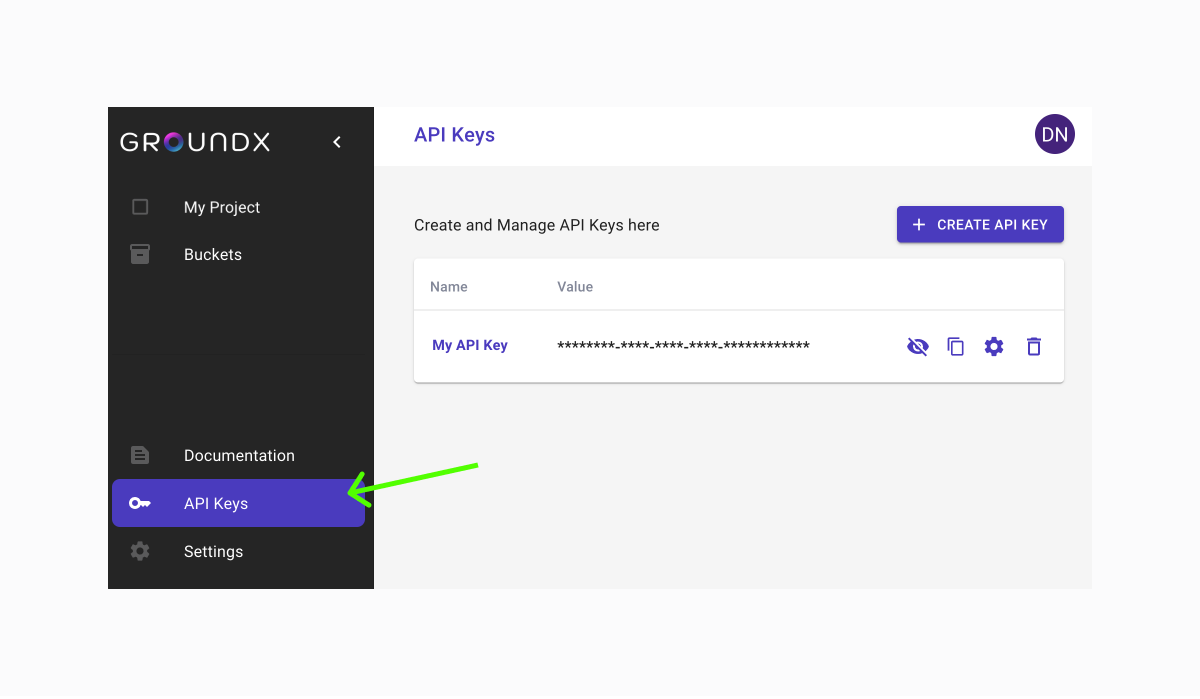
Log into the GroundX Dashboard and navigate to API Keys.
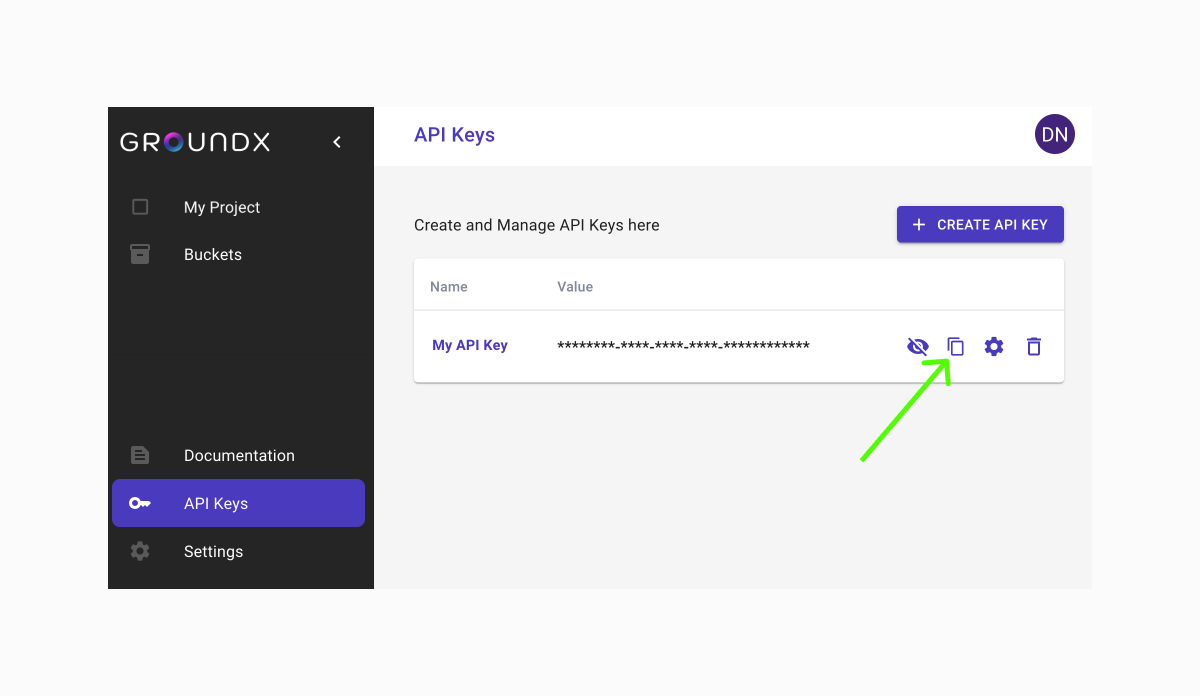
Copy your API Key and save it somewhere for use later in this tutorial.
Step 2: Setting Up GroundX
Users that wish to use the Python or TypeScript SDKs can get started by downloading the relevant package via the following shell commands:
The GroundX client can be set up with the following code in either language. We recommend storing your API key in an environment variable (GROUNDX_API_KEY) rather than hardcoding it in source:
If you’re using a language other than Python or TypeScript, or if you don’t wish to install the Python or TypeScript SDKs, you can use cURL to communicate with the API via HTTP directly.
Step 3: Creating a New Bucket
When you upload a document to GroundX:
- The document is passed through a vision model to identify key components
- Each of those components are passed through different pipelines, depending on if the component is textual, graphical, or tabular, in order to re-represent that data into an LLM friendly textual representation
- contextual information from other parts of the document are baked into that textual representation, creating a context rich and LLM friendly textual representation of each section of the document.
These re-represented components of the document are called “Semantic Objects”, and can be thought of as objects which contain fully contextualized ideas within the document.
After these semantic objects are created, they’re stored within a bucket.
Buckets are queryable containers which store semantic objects. Essentially, you upload a bunch of files to a bucket, the semantic objects derived from those documents are stored in said bucket, then you can search the bucket for semantic objects that are relevant to a natural language query.
Thus, to use GroundX, it’s useful to first create a bucket. You can give a bucket a name, which does not necessarily have to be unique, and you’ll get back a unique bucket_id which can be used to upload documents to and search from that bucket.
The following code creates a new bucket and gets back the bucket_id which we’ll use in future steps:
Step 4: Using an Existing Bucket
You can list all existing buckets in your GroundX account via the following command:
This code can be used to retrieve the bucketId from an existing bucket.
Step 5: Upload Content
To upload content to a bucket, the Document Upload API can be used. This will allow you to upload complex documents in a variety of formats to a particular bucket. In the upload process, the documents will automatically be parsed and the final representation stored in the bucket will be a set of semantic objects.
There are two key ways a document can be uploaded; either by uploading a locally hosted document, or one which is publicly hosted behind some endpoint.
Uploading a locally hosted document can be done with the following code:
/v1/ingest/documents/local accepts one file per call, up to 8MB, and does not support
callbackUrl/callbackData. For larger files, multiple files in one batch, or callback
support, use the client.ingest() SDK method shown above (it uploads via a pre-signed
URL behind the scenes) rather than calling this endpoint directly.
To upload a second file, send another request the same way:
Uploading remotely hosted documents can be done with the following code:
see the Ingest API for more information on arguments.
If your request is successful, regardless of if the upload is from remote or local documents, you will receive a response that looks something like this:
The processId can be used to check the status of the upload.
Step 6: Check the Status of Your Upload
The following request can be used to query the status of your upload:
Be sure to use processId from the previous step.
If your request is successful, you will receive a response that looks something like this:
The value of status will be one of the in-flight values queued, training, or processing, or one of the terminal values complete, error, or cancelled. This can be used to, for instance, wait for a document to be uploaded via incrementally polling.
Step 7: Search Your Content
Make the following request to search your ingested content:
You can also use a groupId or a documentId in place of bucketId in your search query. These will allow you to search a group of buckets or a single document, respectively. Replace query with the query you want to use to search your content.
If your request is successful, will receive a response that looks something like this:
If you need to look up a groupId or bucketId, you can find them in the GroundX Dashboard or by querying for them using the APIs.
Step 8: Using Search Results to Augment an LLM
After search has been completed, the search.text can be used to provide context to a language model. We strongly recommend you use search.text for your LLM completions. We provide search.results in case you want to create your own context from the search results. If you choose to do this, rather than use search.text, we strongly recommend you use search.results[n].suggestedText for your context.
First, the search.text can be unpacked from the response
Once you have relevant text for your request, you will need to combine the text with instructions and submit them to OpenAI.
Here’s an example of what a completion instruction could look like. For a full example system prompt and prompt-writing guidance, see Prompting and Integration.
Combine your completion instructions with your curated GroundX search results:
Replace openaiModel with your preferred model, instruction with your completion instructions, llmText with your curated GroundX search results, and query with your query. This, effectively is an implementation of “Retrieval Augmented Generation” (RAG) where an augmented prompt consisting of a query and retrieved context about that query are passed to a language model for generation.
Errors and Rate Limits
HTTP status codes
All GroundX API endpoints use standard HTTP status codes. The two you’re most likely to encounter while integrating are:
A 401 always means the X-API-Key header is wrong or the key doesn’t have access to
the requested resource. A 400 means the request body or path/query parameters failed
server-side validation — the response body typically includes a description of the
problem.
Ingest limits
Check file size and page count before uploading, and split documents that exceed the recommended limits. Very long documents produce large numbers of chunks that dilute search relevance, hence the 200-page recommendation. A batch size of 20 (rather than the 50 hard limit) leaves headroom for retries and avoids client-side or network timeouts on slower connections.
Search limits
Queue or debounce search requests in your application to stay within these targets. If you fan out a single user query to multiple buckets or groups, count each search call separately toward the concurrency limit.
Handling HTTP 429
If you receive a 429 Too Many Requests response, back off and retry with exponential
delay: start at 1 second, double on each retry, cap at 60 seconds. Don’t retry
immediately.
Next Steps
This guide covered the most fundamental ideas in employing GroundX. We recommend checking out the prompting and integration guide for tips on how you can achieve consistent and high quality responses in your use case.